Indice
| Share That! | ||
| Status | Platforms | Download |
|---|---|---|
|
Active |
|
|
Share That! is a homebrew app for Nintendo Switch that let you to share any screenshot or video (taken with the official function of your console) using any IFTTT applet.
This means that you can share the screenshot/video with any online service that is supported by IFTTT, such as Twitter and Facebook Pages but also with hundreds of other services, such as Telegram, Discord, Android, Pushbullet, Amazon/Google/One Drive, Dropbox, Blogger, Line, Flickr, Pinterest, Pocket, Reddit, Wordpress, Tumblr, etc…
Table of Contents
How it works
The program works by triggering the webhook applet of your IFTTT account, passing 2 values to it:
- A custom message/caption for your image/video ({Value1} in IFTTT applets)
- The image/video URL ({Value2} in IFTTT applets)
Please note that since IFTTT only accepts an URL for the image/video file, the program will upload it on Imgur before passing it to IFTTT, so you'll get also an Imgur link to your media file.
Installation
Just extract the ZIP package of the program you can download here above and copy the switch folder in the root of your MicroSD, then you can launch it using Homebrew Menu.
Important notes:
- Do not run the application in applet mode (for example by launching it from SXOS homebrew loader in the album menu) because the function to call the system keyboard does not seem to work while the program is in applet mode and so you won't be able to attach any message/caption to your image/video when sharing it. The correct way to launch the program is by using Homebrew Menu in full memory mode (keep pressed R trigger while launching any installed game).
- You need to edit the attached config.txt file by inserting the requested data from your Imgur and IFTTT accounts. Please read the Configuration section below to find instructions about how to edit it properly.
Configuration
The program will read configuration data from a config.txt file that must be inserted in the same folder of the app's executable (the .nro file). The configuration must be a JSON string like the following:
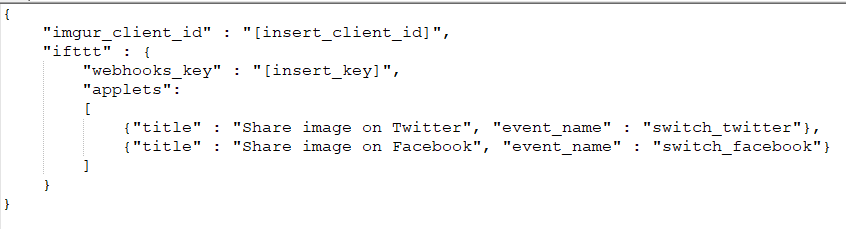
Please note that the config.txt file must contain a valid JSON string otherwise the program will fail to load any param from it! You can use any JSON validator tool you can easily find online, for example https://jsonlint.com/, to check if there are errors in its structure.
You have to insert only 3 things in this config file: a valid Imgur client_id, a valid IFTTT webhook key and of course the event name of your IFTTT applets. Now let's see how to get them:
Imgur Client ID
First of all you need to register an account on Imgur website, if you don't have one already. So just go to https://imgur.com/register and follow the instructions to create a free account. Once you have a working registered account and you have logged in, go to https://api.imgur.com/oauth2/addclient and you'll should get a similar form (click on the image to open it at full size):
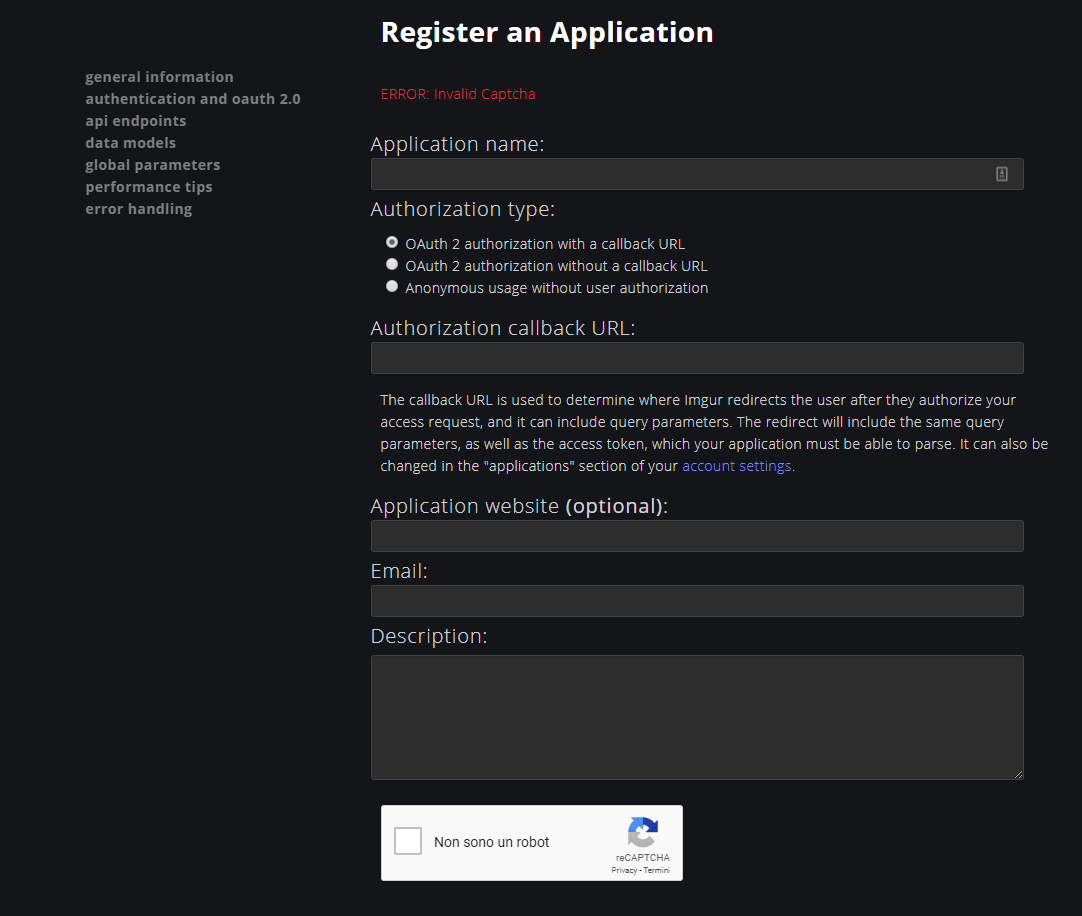
- In “Application name:” just insert any name you want.
- In “Authorization type:” choose the “Anonymous usage without user authorization” option
- In “Authorization callback URL:” just insert a “/” character
- In “Application website” don't insert anything, it's an optional field
- In “Email” just insert your email
- In “Description” don't insert anything
Complete the reCAPTCHA at the bottom of the page and click on the Sumbit button. You'll get a similar screen:
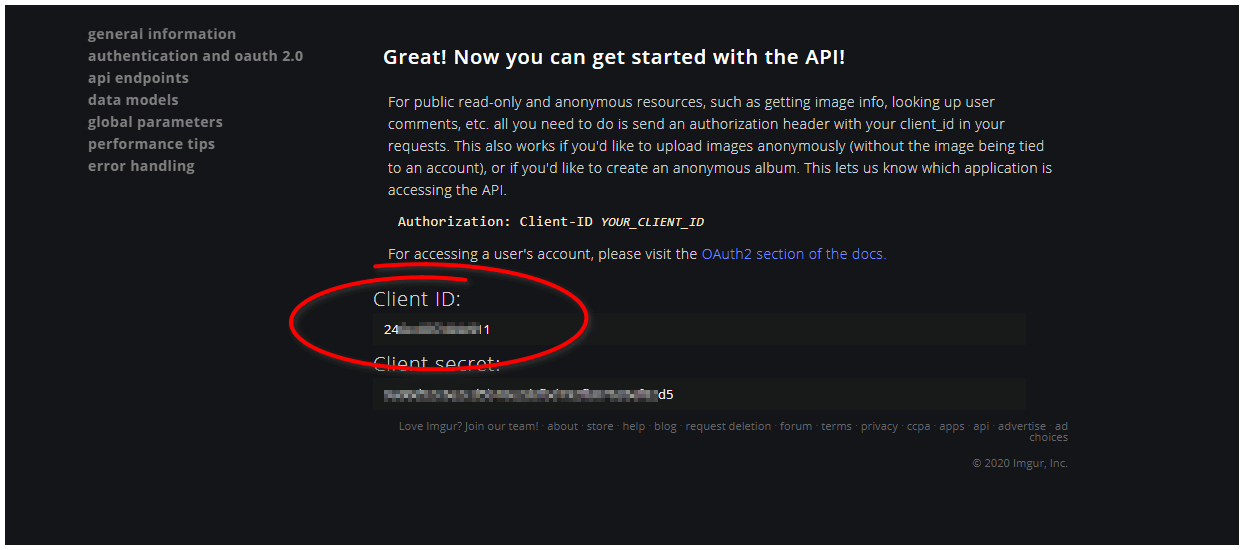
Now just copy the Client ID string from the page and past it in the config.txt file near the imgur_client_id field, replacing the [insert_client_id] string.
For this example I'll use xxXxxXXxxxXx
Webhooks Key
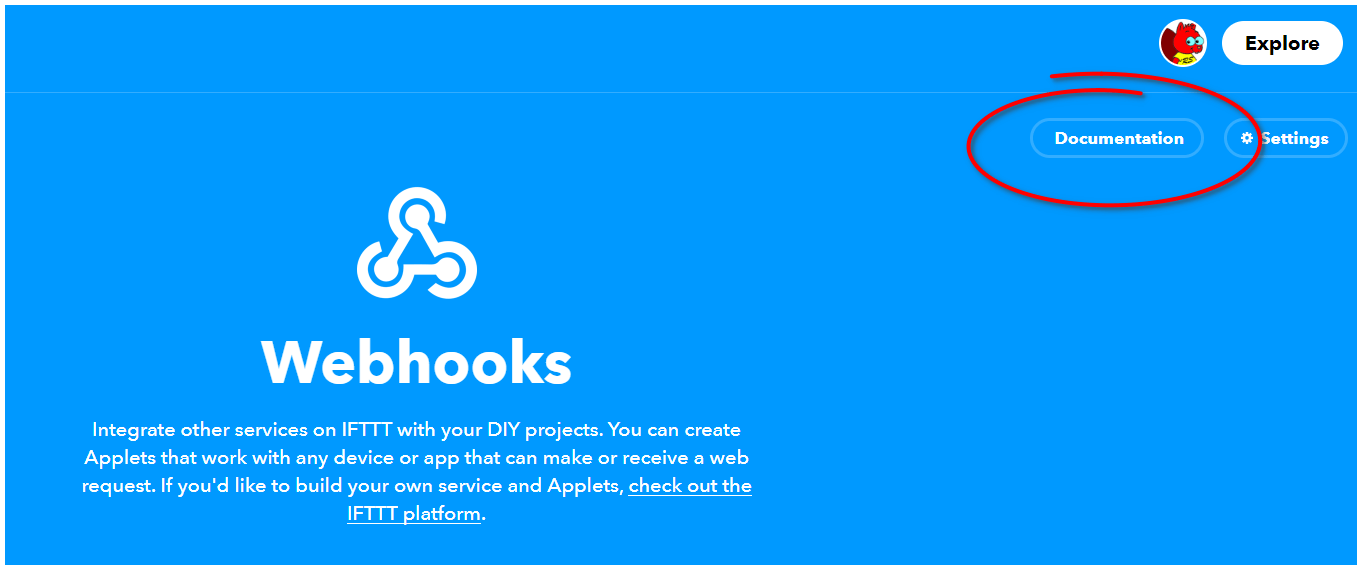
First of all you need an IFTTT account. So just go to https://ifttt.com/join and create a personal account (it's totally free). Once you have an account, you need to go to https://ifttt.com/maker_webhooks and click on the “Documentation” button you can find below your user pic (note: the button will appear only if you're logged in correctly):
Now you should get a similar page:
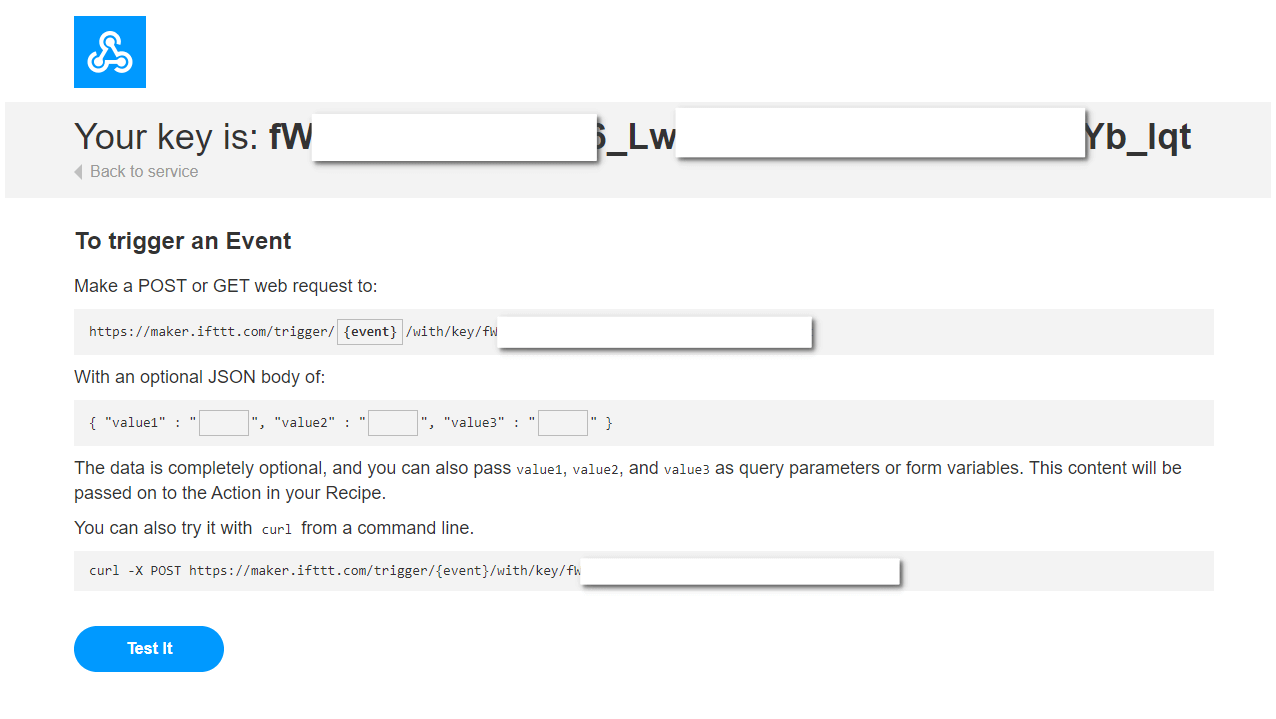
As you can easily imagine the webhooks key you need is indeed the string near “Your key is:” at the top of the page. Just copy it and paste it inside the config.txt file replacing the [insert_key] string near the “webhooks_key” string.
For this example I'll use xXxxxxXXxxXXxxXxx_xxxXxXXXx_xXx
IFTTT Applets event name
And now it's time to create your personal IFTTT applets. Of course I will not explain how to create applets for all the existing services (since there are hundreds of possibilities), but I'll explain the procedure for a generic one, after all the procedure it's very similar for all of them.
For this example I'll create a Twitter applet so as to share my screenshots on my Twitter account with the app.
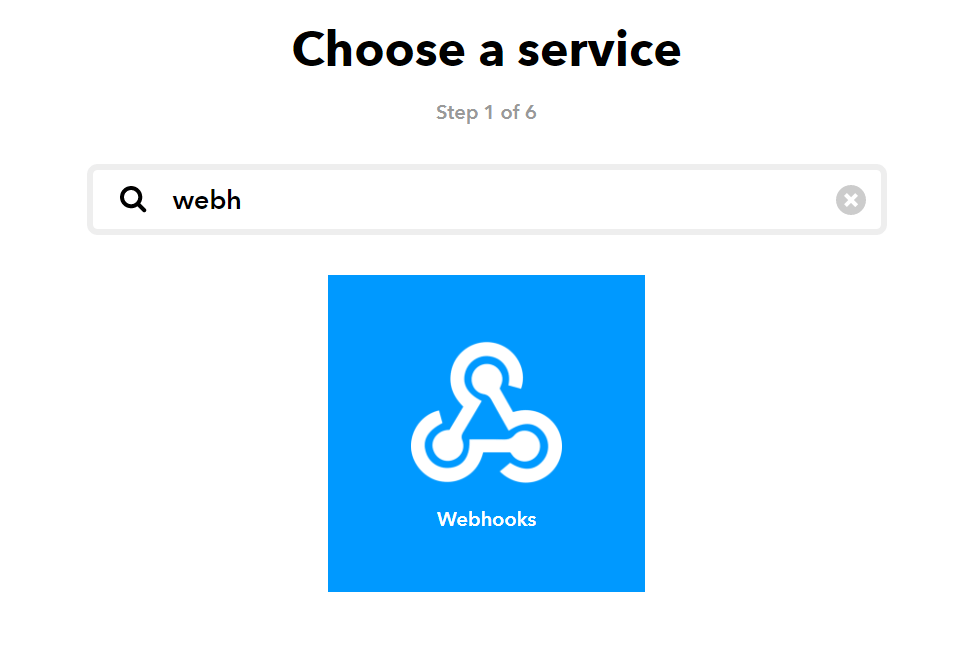
- Since the “trigger” by the program is always a webhook, in this page you'll have to choose the webhooks service for every applet you want to use with the program:

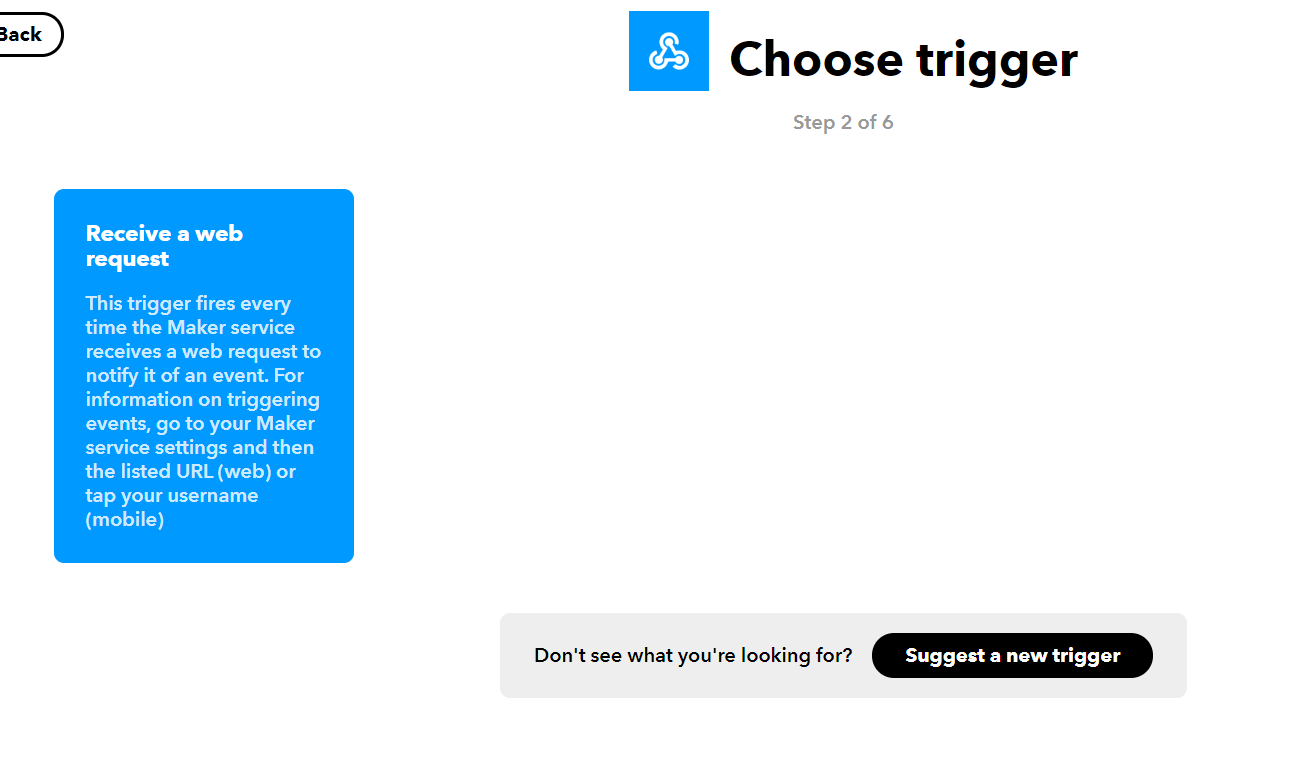
- For the webhooks service there are no options other than “Receive a web request”, so just click on it:

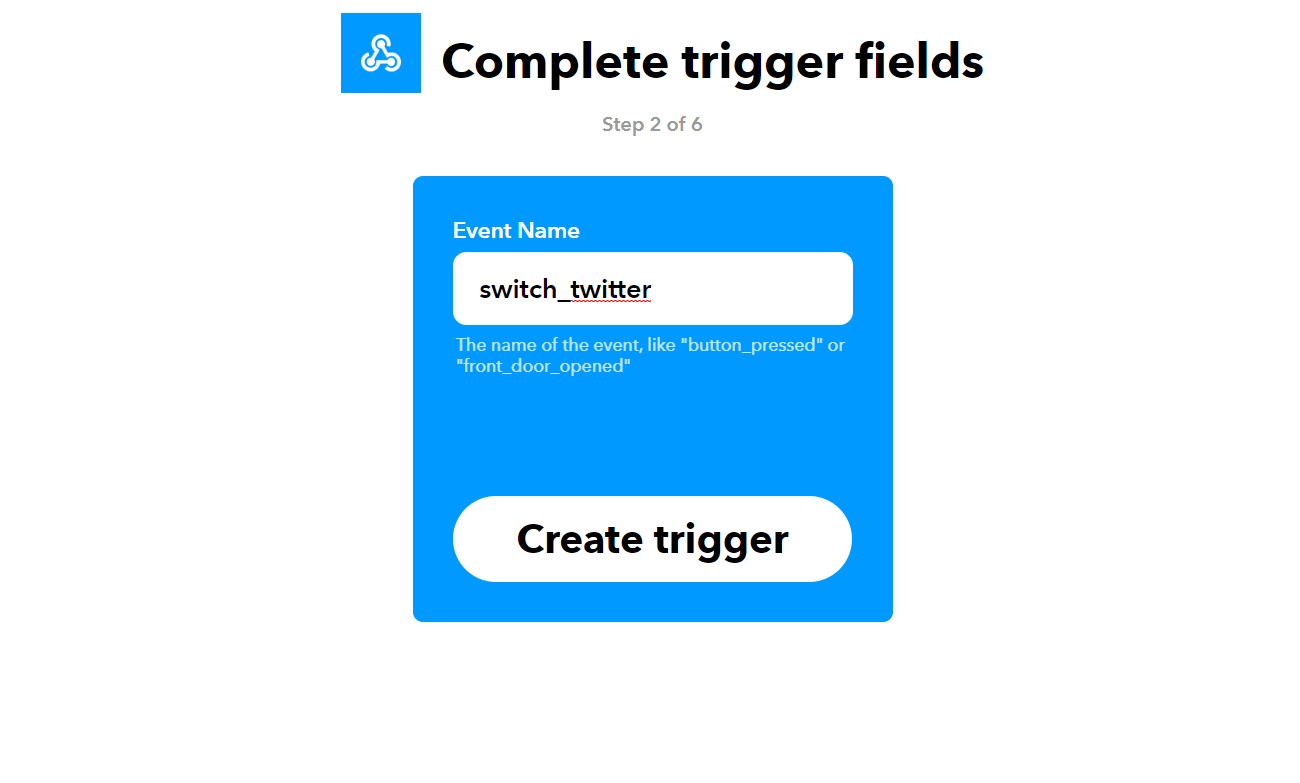
- Now the important part: in this new page you have to enter the event name for your webhook call. This param will be inserted in the config.txt file so keep it simple and remember it. In this example I'll use a very clear and simple switch_twitter event name:

- By clicking on the “Create Trigger” button you'll return to the main page but now you can click on the “That” word, so just do it:

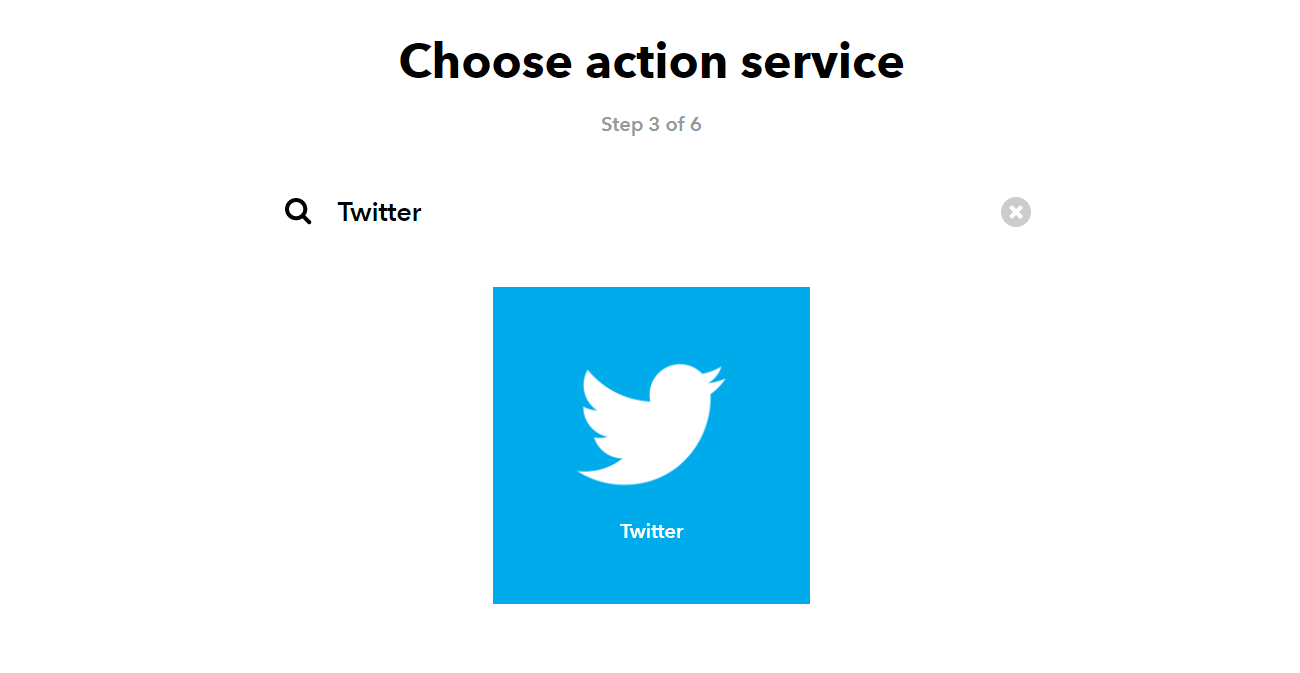
- In the next page you can find any supported service you want to use. I'll go for Twitter:

- The procedure to connect your Twitter account with IFTTT will now begin, just follow the instructions on screen and give to IFTTT the authorization to send tweet at your Twitter account.
- The next page with list all the applets available for the service you chose, in this case for Twitter there are many possibilities:

- Since my wish is to share an image, I'll choose the “Post a tweet with an image” option.
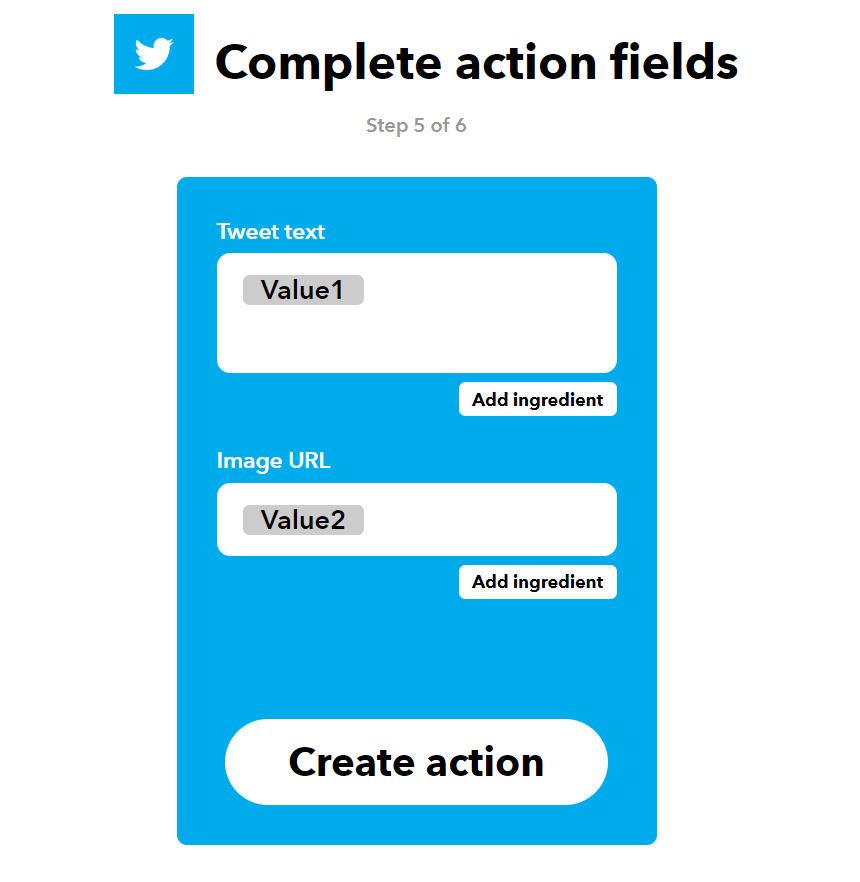
- Now you have to set the params to create your tweet. Since we are using the webhooks service as trigger, in the “Add ingredient” menu you will find 5 different options: Event Name, Value1, Value2, Value3 and OccurredAt. Always remember that Value1 is the message/caption you'll write inside the program and Value2 is the image/video URL the program will pass to the trigger. The Value3 is currently unused, so it will be always empty. Event Name is of course the name you gave in the webhooks configuration page and OccurredAt will be the timestamp when the trigger will be called by the program.
So, to configure my Twitter scheme I will use only Value1 and Value2 (the attached message, if any, and the image URL). So in the “Tweet text” textarea I'll remove all the default text and by clicking on the “Add ingredient” button I'll add only the Value1 option, while in the “Image URL” textbox I'll add the Value2 option by clicking on the “Add ingredient” button below it. I'll get a final result like in this image:

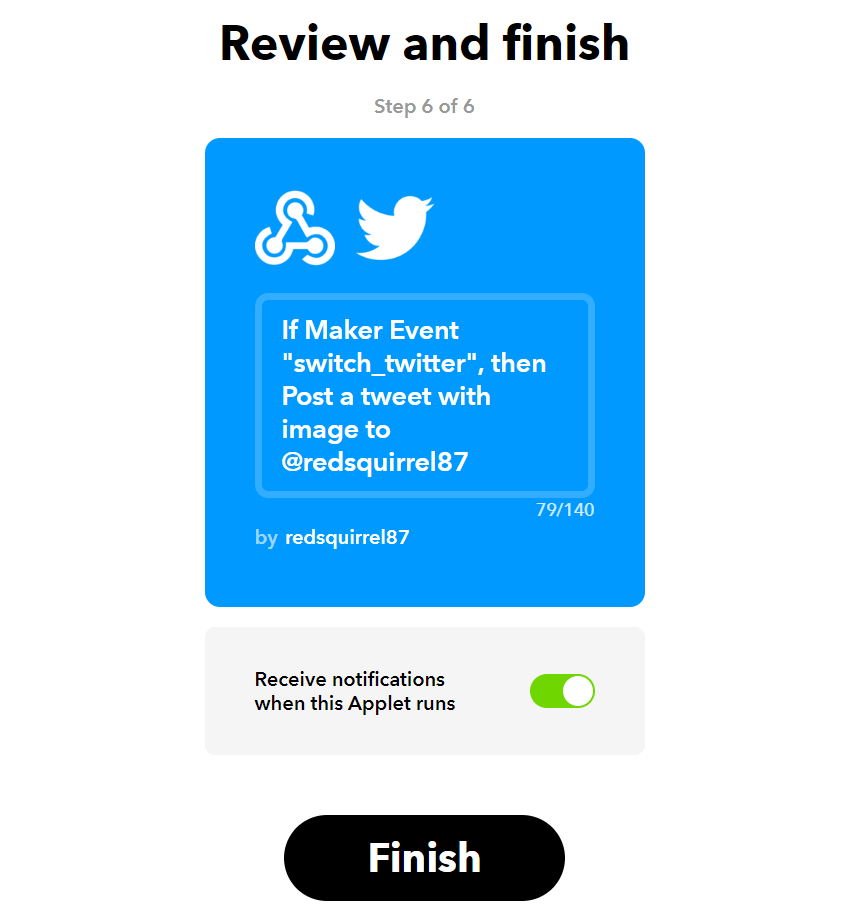
- Once clicked on the “Create action” button I'll get a little recap:

- In this last page I usually remove the check on the “Receive notifications when this Applet runs” since I don't want to receive a notification every time the applet run, but if you want to get it just keep it checked. Click on the “Finish” button and it's done!


Now it's time to add the applet to the configuration file of the program. To do that just insert a new JSON object inside the “applets” array, for example in this case I'll insert the following:
{"title" : "Share image on Twitter", "event_name" : "switch_twitter"}
where for “title” I'll use a custom string that will let me to identify the applet inside the program (in this example Share image on Twitter) and in the “event_name” field i'll insert the event name I used when I created the webhook trigger on IFTTT (so in this example it's switch_twitter). If there are already other applets in the config.txt file please remember to insert a comma “,” between the JSON objects.
config.txt
And so at the end of the above steps, my configuration file (config.txt) will look this way:
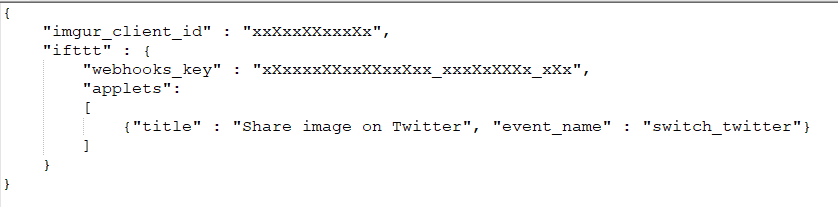
Now just insert the config.txt file in the same folder where is the main executable of the program (the .nro file) and it's done!
Screenshots


Thanks
- To devkitPro authors and maintainers.
- To SwitchBrew wiki authors and maintainers.
- To users who support me and my projects with their donations.
- To my girlfriend for her infinite patience despite all the time I take away from her to devote myself to this hobby.